DevOps with Docker
A comprehensive course on Docker offered by University of Helsinki
Since I started working with DevOps at my current job at Caspeco (I started there in September 2022, and transitioned into a more of a DevOps role in late 2023), I have been working a lot with containers. We started moving towards a microservices architecture, so a lot of my work has revolved around creating smaller services that we deploy as container apps in Azure. The reason for taking this course has therefore been to complement the knowledge and skills I learned at my work, with whatever this course could teach me. I have good experience with University of Helsinki courses (took their Full Stack Open course a while ago), so I look forward to this one!
Chapter 1: Getting started
This chapter is just about some general course information and setting up Docker, etc. But what I really loved was the preamble on LLMs and their role in software development, and how a programmer should approach working with them. I really recommend reading it. Here is just a little taste to whet your appetite:
The rapid development of language models puts the student in a challenging position: is it worth and is it even necessary to learn things at a detailed level, when you can get almost everything ready-made from language models? At this point, it is worth remembering the old wisdom of Brian Kerningham, co-author of The C Programming Language:
“Everyone knows that debugging is twice as hard as writing a program in the first place. So if you’re as clever as you can be when you write it, how will you ever debug it?”
In other words, since debugging is twice as difficult as programming, it is not worth programming such code that you can only barely understand. How can debugging be even possible in a situation where programming is outsourced to a language model and the software developer does not understand the debugged code at all? The exact same thing applies to configuring Docker and might actually be even more severe, if you do not understand the fundamentals, debugging hard Docker related issues is just impossible.
I couldn’t agree more! I think the need to learn the basics well is greater now than ever. Recent research shows that GitHub Copilot has negatively affected code quality since its widespread adoption. I personally don’t use any code completion when I code anymore. It’s like somebody constantly trying to finish your sentences. It is impossible to get any quality work done. I do, however, use LLMs extensively when researching something or trying to learn the basics of something completely new. I do think they can be a great tool, if used correctly.
Chapter 2: Docker basics
Definitions and basic concepts
DevOps and Docker
DevOps (Dev == development, Ops == operations) simply means that the release, configuring and monitoring of software is in the hands of the people who develop it.
Docker is a set of platform as a service (PaaS) products that use OS-level virtualization to deliver software in packages called containers. — (Wikipedia)
Some of the benefits of containers:
- They mitigate the “works on my machine” problem (if you also develop locally using containers, of course)
- Isolated environments: you can run applications that require different runtime environments
- Development: no need to install a bunch of services on your local machine, just spin them up inside a container!
- Scaling: easy to spin up multiple containers at once and load balance traffic between them
The difference between Virtual Machines (VMs) and containers is that VMs run on a hypervisor, which virtualizes the physical hardware.
Each VM includes a full operating system (OS) along with the necessary binaries and libraries, making them heavier and more resource-intensive. Containers, on the other hand, share the host OS kernel and only package the application and its dependencies, resulting in a more lightweight and efficient solution. — (Devops with Docker)
Containers therefore offer faster startup times and less overhead, but less isolation than VMs (the isolation level of containers is at the process level, not the OS level).
Side note: Docker can run natively only on Linux! Docker for Mac actually uses a VM that runs a Linux instance under the hood!
Images and containers
Containers are instances of images. Cooking metaphor:
Image == recipe + ingredients
Container == finished meal
To run a container you need an image and a container runtime (Docker engine). The image provides the instructions (recipe) and dependencies (ingredients) for the container to run.
Image
An image is a file and cannot be changed. An image has a base layer and then additional layers. Images are created from an instructional file called a Dockerfile that is parsed when running docker image build. A Dockerfile is therefore a recipe for creating an image! (Just as an image is a recipe for creating a container)
Important commands:
docker image lsdocker image build
Container
Containers are created from images.
Containers only contain what is required to execute an application; and you can start, stop and interact with them. They are isolated environments in the host machine with the ability to interact with each other and the host machine itself via defined methods (TCP/UDP). — (Devops with Docker)
Important commands:
docker container ls (-a)or the shorterdocker ps
Docker CLI basics
When we use the command line to interact with Docker we are actually interacting with the “Docker Engine”, which consists of:
- CLI client
- a REST API
- Docker daemon
Here is the workflow:
1
run command -> CLI sends request through the REST API to Docker daemon -> Docker daemon handles the request.
To remove an image, you need to first remove the referencing container.
Important commands:
| Command | Explain | Shorthand |
|---|---|---|
docker image ls | Lists all images | docker images |
docker image rm <image> | Removes an image | docker rmi |
docker image pull <image> | Pulls image from a docker registry | docker pull |
docker container ls -a | Lists all containers | docker ps -a |
docker container run <image> | Runs a container from an image | docker run |
docker container rm <container> | Removes a container | docker rm |
docker container stop <container> | Stops a container | docker stop |
docker container exec <container> | Executes a command inside the container | docker exec |
docker container prune | Removes all stopped containers | |
docker image prune | Removes all dangling images |
Exercises
1
2
3
4
5
6
7
8
9
10
11
12
13
14
15
16
17
(base) aljazkovac@Aljazs-MacBook-Pro ~ % docker container run -d nginx
(base) aljazkovac@Aljazs-MacBook-Pro ~ % docker container run -d nginx
(base) aljazkovac@Aljazs-MacBook-Pro ~ % docker container run -d nginx
(base) aljazkovac@Aljazs-MacBook-Pro ~ % docker ps
CONTAINER ID   IMAGE     COMMAND                  CREATED         STATUS         PORTS     NAMES
9caf673c6322   nginx     "/docker-entrypoint.…"   3 seconds ago   Up 2 seconds   80/tcp    magical_napier
500c35b530e2   nginx     "/docker-entrypoint.…"   5 seconds ago   Up 4 seconds   80/tcp    wonderful_elbakyan
a3f9a37b6036   nginx     "/docker-entrypoint.…"   9 seconds ago   Up 7 seconds   80/tcp    funny_hoover
(base) aljazkovac@Aljazs-MacBook-Pro ~ % docker container stop magical_napier
magical_napier
(base) aljazkovac@Aljazs-MacBook-Pro ~ % docker container stop wonderful_elbakyan
wonderful_elbakyan
(base) aljazkovac@Aljazs-MacBook-Pro ~ % docker ps -a
CONTAINER ID   IMAGE     COMMAND                  CREATED          STATUS                      PORTS     NAMES
9caf673c6322   nginx     "/docker-entrypoint.…"   43 seconds ago   Exited (0) 19 seconds ago             magical_napier
500c35b530e2   nginx     "/docker-entrypoint.…"   45 seconds ago   Exited (0) 12 seconds ago             wonderful_elbakyan
a3f9a37b6036   nginx     "/docker-entrypoint.…"   49 seconds ago   Up 48 seconds               80/tcp    funny_hoover
1
2
3
4
5
6
7
8
9
10
11
12
13
14
15
16
17
18
19
20
21
22
23
24
25
26
27
28
29
30
31
32
(base) aljazkovac@Aljazs-MacBook-Pro ~ % docker ps
CONTAINER ID   IMAGE     COMMAND                  CREATED         STATUS         PORTS     NAMES
a3f9a37b6036   nginx     "/docker-entrypoint.…"   6 minutes ago   Up 6 minutes   80/tcp    funny_hoover
(base) aljazkovac@Aljazs-MacBook-Pro ~ % docker stop funny_hoover
funny_hoover
(base) aljazkovac@Aljazs-MacBook-Pro ~ % docker image ls
REPOSITORY   TAG       IMAGE ID       CREATED       SIZE
nginx        latest    678546cdd20c   4 weeks ago   197MB
(base) aljazkovac@Aljazs-MacBook-Pro ~ % docker rm funny_hoover
funny_hoover
(base) aljazkovac@Aljazs-MacBook-Pro ~ % docker container prune
WARNING! This will remove all stopped containers.
Are you sure you want to continue? [y/N] y
Deleted Containers:
9caf673c63227c18914ce027dbb144f541888f8042fd2a88b89525aa5c318808
500c35b530e28f0021b84d8edc038c8504a4f8fad3e32cf016518b8b22e1aa3a
(base) aljazkovac@Aljazs-MacBook-Pro ~ % docker rmi nginx
Untagged: nginx:latest
Untagged: nginx@sha256:9d6b58feebd2dbd3c56ab5853333d627cc6e281011cfd6050fa4bcf2072c9496
Deleted: sha256:678546cdd20cd5baaea6f534dbb7482fc9f2f8d24c1f3c53c0e747b699b849da
Deleted: sha256:cab207776f194b355b5c3a18b7e53be9627cb73dc39d2912e231ef99953dc41c
Deleted: sha256:c336c8c4c4288abf4eae3c08633fac049917cfb366fad891c4ed74c94b7b0017
Deleted: sha256:8eaa3047f3c86725e6711ea52d2a96b3e3a36a930d521f0c7cc049128ef1dda0
Deleted: sha256:6ca5a3876c2d60859bdacfad260ef2efa4c03f505c686367aaa211cca7996ce5
Deleted: sha256:e48be8c89956855bb905f19f3efb3d591623a1ee0a7f484b016267a16983c225
Deleted: sha256:666d17913d2acdfad20fdd2b47b5564ea1660c410cde43e6326bc76598dc2194
Deleted: sha256:52d51720ba2d06cecaed7505a36dbdf74d33d70a2e064ed714f88fe08fd403de
(base) aljazkovac@Aljazs-MacBook-Pro ~ % docker image ls
REPOSITORY   TAG       IMAGE ID   CREATED   SIZE
(base) aljazkovac@Aljazs-MacBook-Pro ~ % docker ps -a
CONTAINER ID   IMAGE     COMMAND   CREATED   STATUS    PORTS     NAMES
(base) aljazkovac@Aljazs-MacBook-Pro ~ %
Running and stopping containers
Run docker run -d -it --name looper ubuntu sh -c 'while true; do date; sleep 1; done'
-d== detached-it== interactive and ttysh -c= shell command
Important commands:
| Command | Explain | Shorthand |
|---|---|---|
docker container logs (-f) | Lists (or follows) the logs | docker logs |
docker container pause | Pauses the container | |
docker container unpause | Unpauses the container | |
docker container attach (--no-stdin) | Attaches to the container | docker attach |
docker exec | Executes command inside container |
If we attach to a container without the no-stdin flag and exit with CTRL + c then we will stop the container.
To execute commands within the container, use docker exec <container>. For example, to run bash you could do docker exec -it <container> bash
Here is a more complicated command: $ docker run -d --rm -it --name looper-it ubuntu sh -c 'while true; do date; sleep 1; done'
The --rm flag removes the container after it has stopped. If we attach to the container with docker attach looper-it and then press the escape sequence CTRL+P, CTRL+Q we will exit the container without killing it. If we exit with CTRL+C then we kill the container, which also removes it (due to the --rm flag).
We install new tools inside a container, e.g., Vim, by running:
docker run -it ubuntuapt-get updateapt-get -y install vim
But the installation done in this way will not be permanent!
Exercises
1
2
3
1. docker run -d --rm -it --name secret-msg devopsdockeruh/simple-web-service:ubuntu
2. docker exec -it secret-msg bash
3. tail -f ./text.log
1
2
3
4
5
6
7
8
9
10
11
12
13
14
15
16
17
18
19
20
21
22
23
24
docker run -it --name curl ubuntu sh -c 'while true; do echo "Input website:"; read website; echo "Searching.."; sleep 1; curl http://$website; done' - this results in 'curl not found'

To fix the problem:

1. docker start curl
2. docker exec -it curl bash
3. apt-get update
4. apt-get -y install curl

Exit the container and test if the solution works:
docker exec -it curl sh -c 'while true; do echo "Input website:"; read website; echo "Searching.."; sleep 1; curl http://$website; done'

Result:
Input website:
helsinki.fi
Searching..
<html>
<head><title>301 Moved Permanently</title></head>
<body>
<center><h1>301 Moved Permanently</h1></center>
<hr><center>nginx/1.24.0</center>
</body>
</html>
Input website:
In-depth dive into images
Where do the images come from?
When we want to find an image to pull we can use the docker search command to look for images. The official images are marked as such. We can pull a certain tag of an image like so: docker pull <image>:<tag>.
A detailed look into an image
Let’s pull a certain tag of the Ubuntu image with docker pull ubuntu:24.04. We get this if we run docker image ls:
1
2
REPOSITORY   TAG       IMAGE ID       CREATED       SIZE
ubuntu       24.04     c3d1a3432580   6 weeks ago   101MB
If we then run docker tag ubuntu:24.04 ubuntu:noble_numbat we get this:
1
2
3
REPOSITORY   TAG            IMAGE ID       CREATED       SIZE
ubuntu       24.04          c3d1a3432580   6 weeks ago   101MB
ubuntu       noble_numbat   c3d1a3432580   6 weeks ago   101MB
And running docker tag ubuntu:24.04 fav_distro:noble_numbat gives us this:
1
2
3
4
REPOSITORY   TAG            IMAGE ID       CREATED       SIZE
fav_distro   noble_numbat   c3d1a3432580   6 weeks ago   101MB
ubuntu       24.04          c3d1a3432580   6 weeks ago   101MB
ubuntu       noble_numbat   c3d1a3432580   6 weeks ago   101MB
An image name therefore consists of three parts and a tag: registry/organisation/image:tag. If it’s just a short name, like ubuntu then we have these defaults:
1
2
3
registry = docker hub
organisation = library
tag = latest
If you have the same image with several tags, then you need to specify the image and the tag to untag it, e.g. docker rmi fav_distro:noble_numbat. Otherwise, you will get the error unable to delete c3d1a3432580 (must be forced) - image is referenced in multiple repositories.
Building images
To build an image, we use a Dockerfile, which is simply a set of instructions for an image.
Let us generate this script:
1
2
3
#!/bin/sh

echo "Hello Docker!"
Give it executable permissions:
1
chmod +x hello.sh
And use this Dockerfile:
1
2
3
4
5
6
7
8
9
10
11
12
13
14
15
16
# Start from the alpine image that is smaller but no fancy tools
FROM alpine:3.21

# Use /usr/src/app as our workdir. The following instructions will be executed in this location.
WORKDIR /usr/src/app

# Copy the hello.sh file from this directory to /usr/src/app/ creating /usr/src/app/hello.sh
# COPY <src> <dest> - Copies files from source to destination in container
# The . at the end means copy to current working directory (/usr/src/app)
COPY hello.sh .

# Alternatively, if we skipped chmod earlier, we can add execution permissions during the build.
# RUN chmod +x hello.sh

# When running docker run the command will be ./hello.sh
CMD ./hello.sh
And let’s build using this instruction:
1
docker build . -t hello-docker
This command:
.tells Docker to look for the Dockerfile in the current directory-t hello-dockertags the image with the name “hello-docker”
The build output shows three steps, which correspond to three layers that constitute this image:
1
2
3
4
5
 => [1/3] FROM docker.io/library/alpine:3.21@sha256:a8560b36e8b8210634f77d9f7f9efd7ffa463e380b75e2e74aff4511df3ef88
 => [internal] load build context
 => => transferring context: 66B
 => CACHED [2/3] WORKDIR /usr/src/app
 => CACHED [3/3] COPY hello.sh .
Layers can act as cache, which means that if we just change the last lines of our Dockerfile, the first two layers of the image can remain unchanged. This can help us build faster pipelines!
Then we can simply run a container from the image with docker run hello-docker.
Let us manually create new layers on top of an image.
We begin by running the container interactively with docker run -it hello-docker sh. Then, in another terminal, we do:
1
2
touch additional.txt
docker cp additional.txt mystifying_elion:/usr/src/app
In another terminal we can check that the file has been created and can see what has changed with docker diff <container>:
1
2
3
4
5
6
C /root
A /root/.ash_history
C /usr
C /usr/src
C /usr/src/app
A /usr/src/app/additional.txt
We can then commit the changes with the command docker commit <container> <new-image-name>.
However, it is much better to simply change the Dockerfile and add the new text file there. We add this to the Dockerfile:
1
RUN touch additional.txt
We can build a new image with docker build . -t hello-docker:v2. Then we can run docker run hello-docker:v2 ls and see that the file has been added.
Important commands:
| Command | Explain | Shorthand |
|---|---|---|
docker search | Searches for images on Docker hub | |
docker diff | Lists file changes in a container | |
docker commit | Commits a container’s file changes |
Note: All commands in a Dockerfile except CMD and TODO: FILL HERE! are executed during build time. CMD and FILL HERE is executed at runtime.
Exercises
1
2
3
4
5
6
7
8
9
10
11
12
13
14
15
16
17
18
# Start from the ubuntu image
FROM ubuntu:24.04

# Use /usr/src/app as our workdir. The following instructions will be executed in this location.
WORKDIR /usr/src/app

# Install curl
RUN apt-get update
RUN apt-get -y install curl

# Copy the file from this directory to /usr/src/app/
COPY script.sh .

# Add execution permissions on the file
RUN chmod +x script.sh

# When running docker run the command will be the one defined here
CMD ./script.sh
1
2
3
4
5
# Start from the ubuntu image
FROM devopsdockeruh/simple-web-service:alpine

# When running docker run the command will be the one defined here
CMD server
Defining start conditions for the container
Instead of simply adding stuff to the Dockerfile, without really knowing if it’s going to work, let’s try another approach: test stuff first before committing it to our Dockerfile.
Once we know what we need, we add it to the Dockerfile. Important: Add the stuff that is most prone to change at the bottom. This way we can save our cached layers.
CMD vs Entrypoint
The difference between CMD and ENTRYPOINT:
ENTRYPOINTdefines the executable that will always run when the container startsCMDprovides default arguments to theENTRYPOINT, or specifies the entire command if noENTRYPOINTis definedCMDcan be overridden from the command line, whileENTRYPOINTrequires the –entrypoint flag to override
Use docker inspectto inspect the image and its defined CMDand ENTRYPOINT.
For example, observe the following Dockerfile:
1
2
3
4
5
6
7
8
9
10
11
12
13
14
15
16
FROM ubuntu:24.04

WORKDIR /mydir

RUN apt-get update && apt-get install -y curl python3
RUN curl -L https://github.com/yt-dlp/yt-dlp/releases/latest/download/yt-dlp -o /usr/local/bin/yt-dlp
RUN chmod a+x /usr/local/bin/yt-dlp

# If we used CMD instead of ENTRYPOINT:
# - Any arguments passed to 'docker run' would completely override the command
# - With ENTRYPOINT, arguments are appended to the command instead
ENTRYPOINT ["/usr/local/bin/yt-dlp"]

# If we add a command here then we can run the container without a specific argument
# If we do specify an argument then it overrides this, the default, one
CMD ["https://www.youtube.com/watch?v=Aa55RKWZxxI"]
Shell vs Exec form
Shell form (ENTRYPOINT command param1 param2):
- Runs command in a shell (
/bin/sh -c) - Can use shell features (environment variables, pipes, etc.)
- Example:
ENTRYPOINT echo "Hello $NAME"
Exec form (ENTRYPOINT ["command", "param1", "param2"]):
- Runs command directly without shell
- More efficient (no shell overhead)
- Cannot use shell features directly
- Example:
ENTRYPOINT ["/usr/local/bin/app", "--port", "8080"]
Example:
1
2
# Shell form - using && and environment variable
ENTRYPOINT mkdir -p /data/$FOLDER && echo "Created folder" && ls /data
If we run
1
2
docker run -e FOLDER=logs myimage
# Creates /data/logs, prints "Created folder", and lists contents
then this would work.
Exec form would not work:
1
2
# Exec form - cannot use && or $FOLDER
ENTRYPOINT ["mkdir", "-p", "/data/$FOLDER", "&&", "echo", "Created folder", "&&", "ls", "/data"]
This would fail because:
- $FOLDER won’t be evaluated
- && isn’t valid as a command argument
To use environment variables with exec form, you’d need to define the shell explicitly:
1
ENTRYPOINT ["/bin/sh", "-c", "mkdir -p /data/$FOLDER && echo 'Created folder' && ls /data"]
Best practice: Use exec form unless shell features are needed, and keep the same form for both ENTRYPOINT and CMD.
Important commands:
| Command | Explain | Shorthand |
|---|---|---|
docker inspect <container/image> | Shows detailed information about a container or image in JSON format | |
docker cp <container>:<src-path> <dest-path> | Copies files/folders between a container and local filesystem |
Interacting with the container via volumes and ports
Instead of using the docker cp command to copy files from a container to local disk, we can use Docker volumes and bind mounts:
Docker Storage: Volumes vs Bind Mounts
Volumes
- Managed by Docker (
/var/lib/docker/volumes/) - Portable and easier to backup
- Independent of host machine directory structure
- Ideal for production use
Use Volumes for:
- Persisting application data
- Sharing data between containers
- Production environments
- Data backups and migrations
Bind Mounts
- Direct mapping to host machine paths
- Files accessible directly on host system
- Perfect for development environments
- Host machine directory structure dependent
Use Bind Mounts for:
- Development environments
- Quick code changes
- Configuration files
- When direct host machine access is needed
We can run a container from the yt-dlp image and bind our local directory to it like so:
1
$ docker run -v "$(pwd):/mydir" yt-dlp https://www.youtube.com/watch?v=saEpkcVi1d4
We have mounted our current folder as /mydirin the container, so that the video is saved to our local machine instead of the /mydirfolder in the container. We could also mount just a specific file, e.g., -v "$(pwd)/material.md:/mydir/material.md".
Allowing external connections into containers
Programs can send messages to URL addresses, and they can be assigned to listen to any available port. The address 127.0.0.1 is also known as localhost. They always refer to the host on which they are sent or received.
To open a connection to a Docker container we do the following:
- Expose port (add
EXPOSE <port>to the Dockerfile) - Publish port (run the container with
-p <host-port>:<container-port>)
CAREFUL: this short snytax, -p <host-port>:<container-port> basically results in -p 0.0.0.0:<host-port>:<container-port>, which opens the port to anyone!
You can also limit connections to a certain protocol, e.g., EXPORT <port>/UDP and p <host-port>:<container-port>/udp.
Exercises
I created the logs.log file first with touch logs.log, otherwise the -v flag command would create a directory.
Then I ran:
docker run -v "$(pwd)/logs.log:/usr/src/app/text.log" devopsdockeruh/simple-web-service
1
docker run -p 127.0.0.1:8080:8080 web-server
Utilizing tools from the Registry
Observe the following Dockerfile, which containerizes a Ruby on Rails project:
1
2
3
4
5
6
7
8
9
10
11
12
13
14
15
16
17
18
19
20
21
22
23
24
25
26
27
28
29
# We need ruby 3.1.0. I found this from Docker Hub
FROM ruby:3.1.0

EXPOSE 3000

WORKDIR /usr/src/app

# Install the correct bundler version
RUN gem install bundler:2.3.3

# Copy the files required for dependencies to be installed
# Copy these files separately to take advantage of Docker's caching mechanism
COPY Gemfile* ./

# Install all dependencies
RUN bundle install

# Copy all of the source code
COPY . .

# We pick the production mode since we have no intention of developing the software inside the container.
# Run database migrations by following instructions from README
RUN rails db:migrate RAILS_ENV=production

# Precompile assets by following instructions from README
RUN rake assets:precompile

# And finally the command to run the application
CMD ["rails", "s", "-e", "production"]
If you pay attention you will see it closely follows the README file in the project.
Exercises
The goal of this exercise is to containerize an old Java Spring project.
1
2
3
4
5
6
7
8
9
10
11
FROM amazoncorretto:8

EXPOSE 8080

WORKDIR /usr/src/app

COPY . .

RUN ./mvnw package

CMD [ "java", "-jar", "./target/docker-example-1.1.3.jar" ]
Then use the following command:
1
docker build . -t java-project && docker run -p 127.0.0.1:8080:8080 java-project
Project Exercises
1
2
3
4
5
6
7
8
9
10
11
12
13
14
15
16
17
18
19

FROM node:16.20.2-bullseye-slim

WORKDIR /usr/src/app

# Port 5000 is reserved on my MacBook, so using port 3000 instead
EXPOSE 3000

COPY . .

RUN npm install

RUN npm run build

RUN npm install -g serve

CMD [ "serve", "-s", "-l", "3000", "build" ]
Then use this to run:
1
docker build . -t project-frontend && docker run -p 127.0.0.1:3000:3000 project-frontend
1
2
3
4
5
6
7
8
9
10
11
12
13
FROM golang:1.16-bullseye

WORKDIR /usr/src/app

EXPOSE 8080

COPY . .

RUN go build

RUN go test ./...

CMD [ "./server" ]
Then run this:
1
docker build --platform linux/amd64 -t project-backend . && docker run -p 127.0.0.1:8080:8080 project-backend
Dockerfile for the frontend:
1
2
3
4
5
6
7
8
9
10
11
12
13
14
15
16
17
18
FROM node:16.20.2-bullseye-slim

WORKDIR /usr/src/app

# Port 5000 is reserved on my MacBook, so using port 3000 instead
EXPOSE 3000

COPY . .

RUN npm install

ENV REACT_APP_BACKEND_URL=http://localhost:8080

RUN npm run build

RUN npm install -g serve

CMD [ "serve", "-s", "-l", "3000", "build" ]
Dockerfile for the backend:
1
2
3
4
5
6
7
8
9
10
11
12
13
14
15
FROM golang:1.16-bullseye

WORKDIR /usr/src/app

EXPOSE 8080

COPY . .

ENV REQUEST_ORIGIN=http://localhost:3000

RUN go build

RUN go test ./...

CMD [ "./server" ]
Command to build and run the frontend:
1
docker build . -t project-frontend && docker run -p 127.0.0.1:3000:3000 project-frontend
1
docker build --platform linux/amd64 -t project-backend . && docker run -p 127.0.0.1:8080:8080 project-backend
I had an LLM build a simple Razor .NET web app where one can post messages in a simple GUI. Then I containerized it and published it to Docker Hub
Here is the Dockerfile I used:
1
2
3
4
5
6
7
8
9
10
11
12
13
14
15
16
17
FROM mcr.microsoft.com/dotnet/sdk:8.0 AS build

WORKDIR /usr/src/app

COPY . .

RUN dotnet publish -c Release -o /app/publish

FROM mcr.microsoft.com/dotnet/aspnet:8.0

WORKDIR /app

COPY --from=build /app/publish .

EXPOSE 8080

CMD [ "dotnet", "SimpleMessageBoard.dll" ]
I have deployed the app from the previous ex. (1.15) to DigitalOcean. I built the image and ran it locally like this:
1
docker build --platform linux/amd64 -t project-homework . && docker run -p 127.0.0.1:8080:8080 project-homework
Then I created a repository on Docker hub called aljazkovac/project-homework and pushed the image there.
On DigitalOcean I then created a webapp and simply connected it to the image I pushed to Docker Hub. Then it was easy to deploy via the GUI there, and you can access the running app here(if it no longer works then it’s because the exercise has been graded and I destroyed the resource to not have to pay for it). But you can always pull the image locally from Docker Hub and run it there!
Summary
In this chapter we learned the basics of containers and images. We learned how to write simple Dockerfiles, and how to use their caching mechanism to our advantage. We have also learned how to push images to Docker Hub, where they can be pulled by other users.
Certificate of completion
 Certificate for completing the Docker basics part of the DevOps with Docker course
Validate the certificate at the validation link.
Chapter 3: Docker compose
Basics of docker compose
We will be using Docker Compose to define and run multi-container applications.
| Command | Explain |
|---|---|
docker compose up | Starts the services defined in the docker-compose.yaml file |
docker compose down | Stops and removes the running services |
docker compose logs | Shows the logs of the services |
docker compose ps | Lists all the services and their current status |
Find the full list of commands here.
1
2
3
4
5
6
services:
  simple-web-service:
    image: devopsdockeruh/simple-web-service
    volumes:
      - ./logs.log:/usr/src/app/text.log
    container_name: simple-web-service
Read here about how to add a command to docker compose. Also, read here about how to add environment variables.
1
2
3
4
5
6
7
services:
  web-server-compose:
    image: devopsdockeruh/simple-web-service
    ports:
      - 127.0.0.1:8080:8080
    command: server
    container_name: web-server-compose
I have decided to use the already built local images:
1
2
3
4
5
6
7
8
9
10
11
services:
  frontend:
    image: project-frontend:latest
    ports:
      - 127.0.0.1:3000:3000
    container_name: frontend
  backend:
    image: project-backend:latest
    ports:
      - 127.0.0.1:8080:8080
    container_name: backend
Docker networking
Docker compose starts and automatically joins the defined services into a network with a DNS. The containers can then simply reference each other with their service names.
1
2
3
4
5
6
7
8
9
10
11
12
13
14
15
16
17
services:
  frontend:
    image: project-frontend:latest
    ports:
      - 127.0.0.1:3000:3000
    container_name: frontend-container
  backend:
    image: project-backend:latest
    ports:
      - 127.0.0.1:8080:8080
    container_name: backend-container
    restart: unless-stopped
    environment:
      - REDIS_HOST=redis
  redis:
    image: redis:7.2-bookworm
    container_name: redis-container
Manual network definition
It is possible to define a network manually in a docker compose file, and to establish a connection to an external network (a network defined in another docker compose file).
1
2
3
4
5
6
7
8
9
services:
  db:
    image: postgres:13.2-alpine
    networks:
      - database-network <em># Name in this Docker Compose file</em>

networks:
  database-network: # Name in this Docker Compose file
    name: database-network # Name that will be the actual name of the network
1
2
3
4
5
6
7
8
9
10
services:
  db:
    image: backend-image
    networks:
      - database-network

networks:
  database-network:
    external:
      name: database-network # Must match the actual name of the network
Scaling
Docker compose has the ability to scale a service and create multiple instances. For example, let’s say we have the following docker compose:
1
2
3
4
5
6
7
services:
  whoami:
    image: jwilder/whoami
    # Leave the host port unspecified, otherwise all instances will try to connect to the same port;
    # when left unspecified, Docker will automatically choose a free port.
    ports:
      - 8000
Then we can run this: docker compose up --scale whoami=3 to spin up three containers of the same service. We can run docker compose port --index 1 whoami 8000 (change index for the other two) to see what ports the containers are running on.
For this type of a scaled up service, one would often use a load balancer, e.g., nginx-proxy:
1
2
3
4
5
6
7
8
9
10
11
12
13
14
services:
  whoami:
    image: jwilder/whoami
    environment:
      # Nginx-proxy needs to know where to route!
      - VIRTUAL_HOST=whoami.colasloth.com
  proxy:
    image: jwilder/nginx-proxy
    volumes:
      # docker.sock provides access to the Docker Engine API, which contains all the information about
      # running containers, their configs, and their metadata.
      - /var/run/docker.sock:/tmp/docker.sock:ro # ro stands for read-only
    ports:
      - 80:80
Also read about colasloth.com if you’re interested. It is a clever developer tool that saves developers from editing their local /etc/hosts file. Instead, colasloth.com always points to localhost! Another interesting thing to learn about is docker.sock: here is a good resource!
Understanding colasloth.com and /etc/hosts
When developing locally with multiple services, you often need different domain names pointing to your local machine. Traditionally, this is done by editing the /etc/hosts file, which is a local system file that maps hostnames to IP addresses. It acts as a local DNS lookup table that your operating system checks before making DNS queries to external DNS servers.
A typical /etc/hosts file might look like this:
1
2
3
4
5
# Local development environments
127.0.0.1    localhost
127.0.0.1    myapp.local
127.0.0.1    api.myapp.local
127.0.0.1    admin.myapp.local
However, editing this file:
- Requires admin/root privileges
- Needs to be done on each developer’s machine
- Can become messy with many entries
This is where colasloth.com comes in - it’s a clever developer tool that automatically resolves all its subdomains to 127.0.0.1 (localhost). This means you can use any subdomain like myapp.colasloth.com or api.colasloth.com and it will point to your local machine, without any /etc/hosts file modifications!
Example usage in docker-compose:
1
2
3
4
5
6
7
services:
  frontend:
    environment:
      - VIRTUAL_HOST=app.colasloth.com
  api:
    environment:
      - VIRTUAL_HOST=api.colasloth.com
This makes local development much easier, especially when working with multiple services that need different domain names.
Understanding docker.sock
The docker.sock file is a Unix socket that serves as the primary entry point for the Docker API. It allows processes to communicate with the Docker daemon, which manages containers, images, networks, and volumes on your system.
When you mount docker.sock into a container like this:
1
2
3
4
5
services:
  proxy:
    image: nginx-proxy
    volumes:
      - /var/run/docker.sock:/tmp/docker.sock:ro # ro = read-only
You’re essentially giving that container access to the Docker daemon’s API. This is particularly useful for:
- Container Management: The container can create, stop, or remove other containers
- Auto-Discovery: Services like nginx-proxy can automatically detect new containers and update their configuration
- Monitoring: Tools can collect metrics about running containers
Security Note: Mounting docker.sock gives significant power to the container - it can control the Docker daemon and other containers. Always:
- Use read-only mode (
ro) when possible - Only mount it to trusted containers
- Be cautious with permissions
A common use case is with reverse proxies that need to automatically detect and route traffic to newly created containers, as shown in our scaling example above.
We have the following docker compose:
1
2
3
4
5
6
7
8
9
10
11
12
13
14
15
16
17
18
services:
  calculator:
    image: devopsdockeruh/scaling-exercise-calculator
    ports:
      - 3000:3000
    container_name: calculator
  compute:
    image: devopsdockeruh/scaling-exercise-compute
    environment:
      - VIRTUAL_HOST=compute.localtest.me
  load-balancer:
    build: ./load-balancer
    image: load-balancer
    volumes:
      - /var/run/docker.sock:/tmp/docker.sock:ro
    ports:
      - 80:80
    container_name: load-balancer
I scaled the computeservice to two container instances and got it to pass the test:
1
docker compose up --scale compute=2
Volumes in action
We have the following docker compose file:
1
2
3
4
5
6
7
8
9
10
11
12
13
services: # Start of services definition
  db: # Name of the service
    image: postgres # Use official PostgreSQL image
    restart: unless-stopped # Restart container unless manually stopped
    environment: # Environment variables section
      POSTGRES_PASSWORD: example # Set PostgreSQL root password
    container_name: db_redmine # Explicitly name the container
    volumes: # Container's volume mappings
      - database:/var/lib/postgresql/data # Map named volume 'database' to PostgreSQL data directory

volumes: # Docker volumes declaration
  database: # Declare a volume named 'database'
  # We could specify further options here, e.g., driver, driver_opts, etc.
If we used the Postgres image without a volume configuration, an anonymous volume would still be created because the image’s Dockerfile has a VOLUME instruction, but “wouldn’t persist when the container is deleted and re-created.”
We can now add Redmine and Adminer like so:
1
2
3
4
5
6
7
8
9
10
11
12
13
14
15
16
17
18
19
20
21
22
23
24
25
26
27
28
29
30
31
services:
  db:
    image: postgres
    restart: unless-stopped
    environment:
      POSTGRES_PASSWORD: example
    container_name: db_redmine
    volumes:
      - database:/var/lib/postgresql/data
  redmine:
    image: redmine:5.1-alpine
    environment:
      - REDMINE_DB_POSTGRES=db
      - REDMINE_DB_PASSWORD=example
    ports:
      - 9999:3000
    volumes:
      - files:/usr/src/redmine/files
    depends_on:
      - db
  adminer:
    image: adminer:4
    restart: always
    environment:
      - ADMINER_DESIGN=galkaev
    ports:
      - 8083:8080

volumes:
  database:
  files:
1
2
3
4
5
6
7
8
9
10
11
12
13
14
15
16
17
18
19
20
21
22
23
24
25
26
27
28
29
services:
  frontend:
    image: project-frontend:latest
    ports:
      - 127.0.0.1:3000:3000
    container_name: frontend-container
  backend:
    image: project-backend:latest
    ports:
      - 127.0.0.1:8080:8080
    restart: unless-stopped
    container_name: backend-container
    environment:
      - REDIS_HOST=redis
      - POSTGRES_HOST=db
      - POSTGRES_USER=postgres-user
      - POSTGRES_PASSWORD=postgres-password
      - POSTGRES_DATABASE=postgres-db
  redis:
    image: redis:7.2-bookworm
    container_name: redis-container
  db:
    image: postgres
    restart: unless-stopped
    container_name: db-postgres-container
    environment:
      - POSTGRES_USER=postgres-user
      - POSTGRES_PASSWORD=postgres-password
      - POSTGRES_DB=postgres-db
We didn’t define a named volume for the postgres service, but Docker has nevertheless created one for us, which we can see if we run docker inspect on the container:
1
2
3
4
5
6
7
8
9
10
11
12
"Mounts": [
            {
                "Type": "volume",
                "Name": "d842ae7ba093ff1045998bed12867a2b0c7d6650a6569c75449acf0925b40987",
                "Source": "/var/lib/docker/volumes/d842ae7ba093ff1045998bed12867a2b0c7d6650a6569c75449acf0925b40987/_data",
                "Destination": "/var/lib/postgresql/data",
                "Driver": "local",
                "Mode": "",
                "RW": true,
                "Propagation": ""
            }
        ],
Here is a very easy-to-understand difference between a named Docker volume and a bind mount.
Named Docker volume
1
2
3
4
5
6
7
8
9
10
11
12
13
14
15
16
17
18
19
20
21
22
23
24
25
26
27
28
29
30
31
32
33
34
services:
  frontend:
    image: project-frontend:latest
    ports:
      - 127.0.0.1:3000:3000
    container_name: frontend-container
  backend:
    image: project-backend:latest
    ports:
      - 127.0.0.1:8080:8080
    restart: unless-stopped
    container_name: backend-container
    environment:
      - REDIS_HOST=redis
      - POSTGRES_HOST=db
      - POSTGRES_USER=postgres-user
      - POSTGRES_PASSWORD=postgres-password
      - POSTGRES_DATABASE=postgres-db
  redis:
    image: redis:7.2-bookworm
    container_name: redis-container
  db:
    image: postgres
    restart: unless-stopped
    container_name: db-postgres-container
    environment:
      - POSTGRES_USER=postgres-user
      - POSTGRES_PASSWORD=postgres-password
      - POSTGRES_DB=postgres-db
    volumes:
      - database:/var/lib/postgresql/data

volumes:
  database:
This will create a named Docker volume like so:
1
2
3
(base) aljazkovac@Aljazs-MacBook-Pro ~ % docker volume ls
DRIVER    VOLUME NAME
local     unpublished_posts_database
This will create a named Docker volume, and it will work fine, but you won’t be able to inspect the volume locally on your machine. Instead, the files are stored in Docker’s internal volume management.
Bind mount
However, if we do this:
1
2
3
4
5
6
7
8
9
10
11
12
13
14
15
16
17
18
19
20
21
22
23
24
25
26
27
28
29
30
31
services:
  frontend:
    image: project-frontend:latest
    ports:
      - 127.0.0.1:3000:3000
    container_name: frontend-container
  backend:
    image: project-backend:latest
    ports:
      - 127.0.0.1:8080:8080
    restart: unless-stopped
    container_name: backend-container
    environment:
      - REDIS_HOST=redis
      - POSTGRES_HOST=db
      - POSTGRES_USER=postgres-user
      - POSTGRES_PASSWORD=postgres-password
      - POSTGRES_DATABASE=postgres-db
  redis:
    image: redis:7.2-bookworm
    container_name: redis-container
  db:
    image: postgres
    restart: unless-stopped
    container_name: db-postgres-container
    environment:
      - POSTGRES_USER=postgres-user
      - POSTGRES_PASSWORD=postgres-password
      - POSTGRES_DB=postgres-db
    volumes:
      - ./database:/var/lib/postgresql/data
Then we are using a bind mount. After running docker compose up a folder called database will be created where the docker compose file is located, and you will be able to inspect those files directly on your host machine.
P.S. The benefit of a bind mount is that you know where the data is located and it is therefore easier to create backups.
1
2
3
4
5
6
7
8
9
10
11
12
13
14
15
16
17
18
19
20
21
22
23
24
25
26
27
28
29
30
31
32
33
34
35
36
37
38
services:
  frontend:
    image: project-frontend:latest
    ports:
      - "127.0.0.1:3000:3000"
    container_name: frontend-container
  backend:
    image: project-backend:latest
    ports:
      - "127.0.0.1:8080:8080"
    restart: unless-stopped
    container_name: backend-container
    environment:
      - REDIS_HOST=redis
      - POSTGRES_HOST=db
      - POSTGRES_USER=postgres-user
      - POSTGRES_PASSWORD=postgres-password
      - POSTGRES_DATABASE=postgres-db
  redis:
    image: redis:7.2-bookworm
    container_name: redis-container
  db:
    image: postgres
    restart: unless-stopped
    container_name: db-postgres-container
    environment:
      - POSTGRES_USER=postgres-user
      - POSTGRES_PASSWORD=postgres-password
      - POSTGRES_DB=postgres-db
    volumes:
      - ./database:/var/lib/postgresql/data
  nginx:
    image: nginx:1.27.4-bookworm
    ports:
      - "127.0.0.1:80:80"
    container_name: nginx-container
    volumes:
      - ./nginx.conf:/etc/nginx/nginx.conf
1
2
3
4
5
6
7
8
9
10
11
12
13
14
15
16
17
18
19
20
21
22
23
24
events { worker_connections 1024; }

http {
  server {
    listen 80;

    # configure here where requests to http://localhost/...
    # are forwarded
    location / {
      proxy_pass http://frontend:3000;
    }

    # configure here where requests to http://localhost/api/...
    # are forwarded
    location /api/ {
      proxy_set_header Host $host;
      # Huge difference if you set this without the trailing slash: in that case, nginx keeps the entire
      # matched location and appends it to the proxy URL => request to /api/ping -> http://backend:8080/api/ping
      # With the trailing slash: nginx removes the matched location before proxying =>
      # request to /api/ping -> http://backend:8080/ping
      proxy_pass http://backend:8080/;
    }
  }
}
There is a crucial difference between proxy_pass http://backend:8080and proxy pass http://backend:8080/:
- proxy_pass
http://backend:8080(no trailing slash) keeps the entire matched location and appends it:- Nginx keeps the entire matched location and appends it to the proxy URL
- Request to
/api/ping→http://backend:8080/api/ping
- proxy_pass
http://backend:8080/(with trailing slash) removes the matched location prefix before proxying:- Nginx removes the matched location prefix before proxying
- Request to
/api/ping→http://backend:8080/ping
I was getting a 403 Forbidden error when making calls from the nginx port (localhost) to the backend (localhost:8080/ping). The reason is that different ports are considered different origins by the browser, and I had previously set the REQUEST_ORIGIN environment variable to http://localhost:3000 directly in the backend Dockerfile (this was fine before when the requests were coming from the frontend service running at port 3000, but now they are coming from nginx running at port 80). However, setting it in docker-compose actually overrides the value set in Dockerfile, so that was the only change I made: I set REQUEST_ORIGIN=http://localhost in the backend service. My docker-compose now looks like this:
1
2
3
4
5
6
7
8
9
10
11
12
13
14
15
16
17
18
19
20
21
22
23
24
25
26
27
28
29
30
31
32
33
34
35
36
37
38
39
services:
  frontend:
    image: project-frontend:latest
    ports:
      - "127.0.0.1:3000:3000"
    container_name: frontend-container
  backend:
    image: project-backend:latest
    ports:
      - "127.0.0.1:8080:8080"
    restart: unless-stopped
    container_name: backend-container
    environment:
      - REQUEST_ORIGIN=http://localhost
      - REDIS_HOST=redis
      - POSTGRES_HOST=db
      - POSTGRES_USER=postgres-user
      - POSTGRES_PASSWORD=postgres-password
      - POSTGRES_DATABASE=postgres-db
  redis:
    image: redis:7.2-bookworm
    container_name: redis-container
  db:
    image: postgres
    restart: unless-stopped
    container_name: db-postgres-container
    environment:
      - POSTGRES_USER=postgres-user
      - POSTGRES_PASSWORD=postgres-password
      - POSTGRES_DB=postgres-db
    volumes:
      - ./database:/var/lib/postgresql/data
  nginx:
    image: nginx:1.27.4-bookworm
    ports:
      - "127.0.0.1:80:80"
    container_name: nginx-container
    volumes:
      - ./nginx.conf:/etc/nginx/nginx.conf
This took a while to get working. The trick was to understand the difference between build-time variables and runtime variables.
Here’s how to identify build-time vs runtime variables:
- Build-time variables are needed during the image build process:
- Variables used in RUN commands
- Variables that affect the build output
- React’s REACTAPP* variables (they get embedded into the built JavaScript)
- Variables needed for compilation/building steps
- Example:
npm run buildneeds REACTAPP* variables because they’re bundled into the static files
- Runtime variables are needed when the container runs:
- Variables used in CMD or ENTRYPOINT
- Configuration for running services (ports, hosts, passwords)
- Backend service configurations
- Database connections
- Example:
REQUEST_ORIGINin the backend because it’s checked during request handling
Quick way to tell:
1
2
- If the variable is used before/during a build step (RUN npm run build) → Build-time
- If the variable is used by the running application → Runtime
That is why I was able to overwrite the REQUEST_ORIGIN variable in the docker-compose previosly, although it is set in the backend Dockerfile, but I was not able to do the same with the REACT_APP_BACKEND_URL variable which is being set in the frontend Dockerfile. The solution was to change it in the Dockerfile and then rebuild the image.
The resulting frontend Dockerfile:
1
2
3
4
5
6
7
8
9
10
11
12
13
14
15
16
17
18
FROM node:16.20.2-bullseye-slim

WORKDIR /usr/src/app

# Port 5000 is reserved on my MacBook, so using port 3000 instead
EXPOSE 3000

COPY . .

RUN npm install

ENV REACT_APP_BACKEND_URL=http://localhost/api

RUN npm run build

RUN npm install -g serve

CMD [ "serve", "-s", "-l", "3000", "build" ]
The resulting docker-compose with the ports removed:
1
2
3
4
5
6
7
8
9
10
11
12
13
14
15
16
17
18
19
20
21
22
23
24
25
26
27
28
29
30
31
32
33
34
35
services:
  frontend:
    image: project-frontend-new:latest
    container_name: frontend-container
  backend:
    image: project-backend:latest
    restart: unless-stopped
    container_name: backend-container
    environment:
      - REQUEST_ORIGIN=http://localhost
      - REDIS_HOST=redis
      - POSTGRES_HOST=db
      - POSTGRES_USER=postgres-user
      - POSTGRES_PASSWORD=postgres-password
      - POSTGRES_DATABASE=postgres-db
  redis:
    image: redis:7.2-bookworm
    container_name: redis-container
  db:
    image: postgres
    restart: unless-stopped
    container_name: db-postgres-container
    environment:
      - POSTGRES_USER=postgres-user
      - POSTGRES_PASSWORD=postgres-password
      - POSTGRES_DB=postgres-db
    volumes:
      - ./database:/var/lib/postgresql/data
  nginx:
    image: nginx:1.27.4-bookworm
    ports:
      - "127.0.0.1:80:80"
    container_name: nginx-container
    volumes:
      - ./nginx.conf:/etc/nginx/nginx.conf
And the result of running the port scan:
1
2
3
4
5
6
7
8
9
10
11
(base) aljazkovac@Aljazs-MacBook-Pro example-frontend % docker run --platform linux/amd64 -it --rm --network host networkstatic/nmap localhost
Starting Nmap 7.92 ( https://nmap.org ) at 2025-03-30 20:26 UTC
Nmap scan report for localhost (127.0.0.1)
Host is up (0.0000040s latency).
Other addresses for localhost (not scanned): ::1
Not shown: 998 closed tcp ports (reset)
PORT    STATE    SERVICE
80/tcp  filtered http
111/tcp open     rpcbind

Nmap done: 1 IP address (1 host up) scanned in 1.41 seconds
We see that the backend and frontend ports are now not published, and only the nginx port (and the rpcbind service port) are open.
Containers in development
Like I mentioned at the beginning, at my current job we are moving to a microservices architecture, and deploying most of our services as container apps in Azure. However, we still do quite a bit of our development the old-fashioned way, meaning we don’t use development containers. One of the reasons for me taking this course is I would like to set up development containers for my team at least, so that one could spin up the backend and frontend with the help of a docker-compose. There will be some challenges along the way, I am sure, like deciding how to deal with Azure key vault, service bus, etc. However, I do think it would benefit our team greatly, and it would certainly solve the “it works on my computer” problem. Feel free to have a look at this interesting study on containerized development environments.
Summary
In this chapter we did the following: docker-compose, networking, scaling and load-balancing (learned about colasloth.com and docker.sock), volumes (bind mounts vs. docker volumes), how to setup nginx reverse proxy (and difference between build-time and runtime variables).
- The basics of
docker-compose - The basics of docker networking
- How to scale and load-balance containers (aldo learned about
colasloth.comanddocker.sock) - Volumes: bind mounts vs. named Docker volumes
- How to setup nginx reverse proxy (and the difference between build-time and runtime variables)
Certificate of completion
 Certificate for completing the Docker basics part of the DevOps with Docker course
Validate the certificate at the validation link.
Chapter 4: Security and optimization
Official images and trust
To find the official version of a certain image, look at Docker Official images, or the accompanying GitHub repository.
A good command to know is docker image history <image>, which shows layers that were created by a command in the image’s Dockerfile. For example, if I have this Dockerfile:
1
2
3
4
5
6
7
8
9
10
11
12
13
14
15
16
17
18
FROM node:16.20.2-bullseye-slim

WORKDIR /usr/src/app

# Port 5000 is reserved on my MacBook, so using port 3000 instead
EXPOSE 3000

COPY . .

RUN npm install

ENV REACT_APP_BACKEND_URL=http://localhost/api

RUN npm run build

RUN npm install -g serve

CMD [ "serve", "-s", "-l", "3000", "build" ]
Then the docker image history command will show this:
1
2
3
4
5
6
7
8
9
10
11
12
13
14
15
16
17
18
19
(base) aljazkovac@Aljazs-MacBook-Pro example-frontend % docker image history project-frontend-new
66781200778c   5 days ago      CMD ["serve" "-s" "-l" "3000" "build"]          0B        buildkit.dockerfile.v0
<missing>      5 days ago      RUN /bin/sh -c npm install -g serve # buildk…   8.68MB    buildkit.dockerfile.v0
<missing>      5 days ago      RUN /bin/sh -c npm run build # buildkit         11MB      buildkit.dockerfile.v0
<missing>      12 days ago     ENV REACT_APP_BACKEND_URL=http://localhost/a…   0B        buildkit.dockerfile.v0
<missing>      12 days ago     RUN /bin/sh -c npm install # buildkit           360MB     buildkit.dockerfile.v0
<missing>      12 days ago     COPY . . # buildkit                             707kB     buildkit.dockerfile.v0
<missing>      12 days ago     EXPOSE map[3000/tcp:{}]                         0B        buildkit.dockerfile.v0
<missing>      12 days ago     WORKDIR /usr/src/app                            0B        buildkit.dockerfile.v0
<missing>      19 months ago   /bin/sh -c #(nop)  CMD ["node"]                 0B
<missing>      19 months ago   /bin/sh -c #(nop)  ENTRYPOINT ["docker-entry…   0B
<missing>      19 months ago   /bin/sh -c #(nop) COPY file:4d192565a7220e13…   388B
<missing>      19 months ago   /bin/sh -c set -ex   && savedAptMark="$(apt-…   9.49MB
<missing>      19 months ago   /bin/sh -c #(nop)  ENV YARN_VERSION=1.22.19     0B
<missing>      19 months ago   /bin/sh -c ARCH= && dpkgArch="$(dpkg --print…   100MB
<missing>      19 months ago   /bin/sh -c #(nop)  ENV NODE_VERSION=16.20.2     0B
<missing>      19 months ago   /bin/sh -c groupadd --gid 1000 node   && use…   337kB
<missing>      19 months ago   /bin/sh -c #(nop)  CMD ["bash"]                 0B
<missing>      19 months ago   /bin/sh -c #(nop) ADD file:abd1ad48ae3ebec7a…   74.4MB
We can see my own image layers (created 5-12 days ago), and the base image layers (created 19 months ago).
Deployment pipelines
In this chapter, we will use GitHub Actions to build and push an image to Docker Hub, and then Watchtower to pull and restart the new image.
This was an interesting exercise. I had to create a GitHub Action workflow that would build and push a Docker image to Docker Hub, and then set up Watchtower to watch the image for changes, and pull and restart if the image has been updated.
I created the following GitHub Action workflow:
1
2
3
4
5
6
7
8
9
10
11
12
13
14
15
16
17
18
19
20
21
22
23
24
25
26
27
28
29
30
31
name: Release Node.js app

on:
  push:
    branches:
      - main

jobs:
  build: # name of the job
    runs-on: ubuntu-latest

    steps:
      - name: Checkout repository
        uses: actions/checkout@11bd71901bbe5b1630ceea73d27597364c9af683

      - name: Set up Docker Buildx
        uses: docker/setup-buildx-action@b5ca514318bd6ebac0fb2aedd5d36ec1b5c232a2

      - name: Log in to Docker Hub
        uses: docker/login-action@74a5d142397b4f367a81961eba4e8cd7edddf772
        with:
          username: $
          password: $

      - name: Build and push Docker image
        uses: docker/build-push-action@471d1dc4e07e5cdedd4c2171150001c434f0b7a4
        with:
          context: .
          push: true
          platforms: linux/amd64,linux/arm64
          tags: $/nodeapp:latest
And I added this line in the Dockerfile for the project I was containerizing:
1
LABEL com.centurylinklabs.watchtower.enable=true
Then I created the following docker-compose:
1
2
3
4
5
6
7
8
9
10
11
12
13
14
15
services:
  app:
    image: aljazkovac/nodeapp:latest
    ports:
      - "127.0.0.1:8080:8080"
    container_name: express-app

  watchtower:
    image: containrrr/watchtower
    environment:
      - WATCHTOWER_POLL_INTERVAL=60 <em># Poll every 60 seconds</em>
    volumes:
      - /var/run/docker.sock:/var/run/docker.sock
    container_name: watchtower
    command: --label-enable
The label-enable command tells Watchtower to only watch the images that have the label com.centurylinklabs.watchtower.enable=true set. That is why I had to add that label to the Dockerfile.
I added a step to the pipeline, which redeploys the app on Digital ocean:
1
2
3
4
5
6
7
8
9
10
11
12
13
14
15
16
17
18
19
20
21
22
23
24
25
26
27
28
29
30
31
32
33
34
35
36
37
38
39
name: Release Simple Message Board App

on:
  push:
    branches:
      - main

jobs:
  build: # name of the job
    runs-on: ubuntu-latest

    steps:
      - name: Checkout repository
        uses: actions/checkout@11bd71901bbe5b1630ceea73d27597364c9af683

      - name: Set up Docker Buildx
        uses: docker/setup-buildx-action@b5ca514318bd6ebac0fb2aedd5d36ec1b5c232a2

      - name: Log in to Docker Hub
        uses: docker/login-action@74a5d142397b4f367a81961eba4e8cd7edddf772
        with:
          username: $
          password: $

      - name: Build and push Docker image
        id: push
        uses: docker/build-push-action@471d1dc4e07e5cdedd4c2171150001c434f0b7a4
        with:
          context: .
          push: true
          platforms: linux/amd64,linux/arm64
          tags: $/project-homework:latest

      - name: Deploy the app
        uses: digitalocean/app_action/deploy@v2
        env:
          SAMPLE_DIGEST: $
        with:
          token: $
To get this to work, I had to add an app spec to the project:
1
2
3
4
5
6
7
8
9
10
11
12
13
14
15
16
17
18
19
20
21
22
23
24
alerts:
  - rule: DEPLOYMENT_FAILED
  - rule: DOMAIN_FAILED
features:
  - buildpack-stack=ubuntu-22
ingress:
  rules:
    - component:
        name: aljazkovac-project-homework
      match:
        path:
          prefix: /
name: lionfish-app
region: ams
services:
  - http_port: 8080
    image:
      registry: aljazkovac
      registry_type: DOCKER_HUB
      repository: project-homework
      digest: ${SAMPLE_DIGEST}
    instance_count: 1
    instance_size_slug: apps-s-1vcpu-0.5gb
    name: aljazkovac-project-homework
Then I tested by making some obvious code changes and checking if they come into effect after pushing them to GitHub.
I wrote this script:
1
2
3
4
5
6
7
8
9
10
11
12
13
14
15
16
17
18
#!/bin/sh
GITHUB_REPO="https://github.com/"$1.git
DOCKER_HUB_REPO=$2

echo "Cloning repository:" $GITHUB_REPO
git clone $GITHUB_REPO repo_dir
cd repo_dir

echo "Building Docker image"
docker build . -t $DOCKER_HUB_REPO

echo "Pushing image to Docker Hub"
docker push $DOCKER_HUB_REPO

cd ..
rm -rf repo_dir

echo "Done!"
The script is super simple and has no error checking. But it works.
I ran it like this:
1
./script.sh aljazkovac/simplemessageboard aljazkovac/simplemessageboardscriptimage
Dockerfile:
1
2
3
4
5
6
7
FROM docker:25-git AS build

WORKDIR /usr/src/app

COPY script.sh .

ENTRYPOINT [ "/usr/src/app/script.sh" ]
Script:
1
2
3
4
5
6
7
8
9
10
11
12
13
14
15
16
17
18
19
20
21
22
23
#!/bin/sh
GITHUB_REPO="https://github.com/"$1.git
DOCKER_HUB_REPO=$2

if [ -n "$DOCKER_USER" ] && [ -n "DOCKER_PWD" ]; then
    echo "Logging in to Docker Hub"
    echo "$DOCKER_PWD" | docker login -u "$DOCKER_USER" --password-stdin
fi

echo "Cloning repository:" $GITHUB_REPO
git clone $GITHUB_REPO repo_dir
cd repo_dir

echo "Building Docker image"
docker build . -t $DOCKER_HUB_REPO

echo "Pushing image to Docker Hub"
docker push $DOCKER_HUB_REPO

cd ..
rm -rf repo_dir

echo "Done!"
Build the image first:
1
docker build -t scriptbuilder .
Create a Docker PAT to use as password.
Run the container:
1
2
3
4
docker run -e DOCKER_USER=your_username \
  -e DOCKER_PWD=your_password \
  -v /var/run/docker.sock:/var/run/docker.sock \
  script-builder aljazkovac/simplemessageboard aljazkovac/simplemessageboardscriptimage
I then also verified that the image works by pulling it from Docker Hub and running it locally.
Using a non-root user
Running containers as root can pose security risks because if an attacker were to gain access to the container, they would have root privileges which could allow modification of system files and installation of malicious software. We should follow the Principle of Least Privilege, meaning that applications should run with the permissions they need to function and nothing more.
Backend Dockerfile with non-root user:
1
2
3
4
5
6
7
8
9
10
11
12
13
14
15
16
17
18
19
20
21
FROM golang:1.16-bullseye

WORKDIR /usr/src/app

RUN adduser -disabled-password backenduser

EXPOSE 8080

COPY . .

ENV REQUEST_ORIGIN=http://localhost:3000

RUN go build

RUN go test ./...

RUN chown -R backenduser:backenduser .

USER backenduser

CMD [ "./server" ]
Frontend Dockerfile with non-root user:
1
2
3
4
5
6
7
8
9
10
11
12
13
14
15
16
17
18
19
20
21
22
23
24
FROM node:16.20.2-bullseye-slim

WORKDIR /usr/src/app

RUN adduser -disabled-password frontenduser

# Port 5000 is reserved on my MacBook, so using port 3000 instead
EXPOSE 3000

COPY . .

RUN npm install

ENV REACT_APP_BACKEND_URL=http://localhost/api

RUN npm run build

RUN npm install -g serve

RUN chown -R frontenduser:frontenduser .

USER frontenduser

CMD [ "serve", "-s", "-l", "3000", "build" ]
Optimizing the image size
A small image size has many advantages:
- Performance
- Less attack surface
We can reduce the size of our images like this:
- Minimize the number of layers in the image (each command that is executed to the base image forms a layer)
- Use small base images
- Use the builder pattern
Builder pattern: with compiled languages remove the tools that are needed to compile the code from the final container:
- Build the code in the first container
- Build artifacts (binaries, static files, bundles, transpiled code) are packaged into the runtime container
- The runtime container contains no tools that are needed to compile the code
Let us first optimize the frontend image. Here is the original image size:
1
2
REPOSITORY       TAG     IMAGE ID       CREATED      SIZE
frontend-nonroot latest  e9e65a4d959c   2 hours ago  746MB
Here is the original Dockerfile for the frontend:
1
2
3
4
5
6
7
8
9
10
11
12
13
14
15
16
17
18
19
20
21
22
23
24
FROM node:16.20.2-bullseye-slim

WORKDIR /usr/src/app

RUN adduser -disabled-password frontenduser

# Port 5000 is reserved on my MacBook, so using port 3000 instead
EXPOSE 3000

COPY . .

RUN npm install

ENV REACT_APP_BACKEND_URL=http://localhost/api

RUN npm run build

RUN npm install -g serve

RUN chown -R frontenduser:frontenduser .

USER frontenduser

CMD [ "serve", "-s", "-l", "3000", "build" ]
If we run docker image history on the original frontend image we get this:
1
2
3
4
5
6
7
8
9
10
11
12
13
14
15
16
17
18
19
20
21
22
23
(base) aljazkovac@Aljazs-MacBook-Pro example-frontend % docker image history e9e65a4d959c
IMAGE          CREATED         CREATED BY                                      SIZE      COMMENT
e9e65a4d959c   2 hours ago     CMD ["serve" "-s" "-l" "3000" "build"]          0B        buildkit.dockerfile.v0
<missing>      2 hours ago     USER frontenduser                               0B        buildkit.dockerfile.v0
<missing>      2 hours ago     RUN /bin/sh -c chown -R frontenduser:fronten…   185MB     buildkit.dockerfile.v0
<missing>      2 hours ago     RUN /bin/sh -c npm install -g serve # buildk…   6.58MB    buildkit.dockerfile.v0
<missing>      2 hours ago     RUN /bin/sh -c npm run build # buildkit         8.68MB    buildkit.dockerfile.v0
<missing>      2 hours ago     ENV REACT_APP_BACKEND_URL=http://localhost/a…   0B        buildkit.dockerfile.v0
<missing>      2 hours ago     RUN /bin/sh -c npm install # buildkit           360MB     buildkit.dockerfile.v0
<missing>      2 hours ago     COPY . . # buildkit                             707kB     buildkit.dockerfile.v0
<missing>      2 hours ago     EXPOSE map[3000/tcp:{}]                         0B        buildkit.dockerfile.v0
<missing>      2 hours ago     RUN /bin/sh -c adduser -disabled-password fr…   338kB     buildkit.dockerfile.v0
<missing>      3 weeks ago     WORKDIR /usr/src/app                            0B        buildkit.dockerfile.v0
<missing>      19 months ago   /bin/sh -c #(nop)  CMD ["node"]                 0B
<missing>      19 months ago   /bin/sh -c #(nop)  ENTRYPOINT ["docker-entry…   0B
<missing>      19 months ago   /bin/sh -c #(nop) COPY file:4d192565a7220e13…   388B
<missing>      19 months ago   /bin/sh -c set -ex   && savedAptMark="$(apt-…   9.49MB
<missing>      19 months ago   /bin/sh -c #(nop)  ENV YARN_VERSION=1.22.19     0B
<missing>      19 months ago   /bin/sh -c ARCH= && dpkgArch="$(dpkg --print…   100MB
<missing>      19 months ago   /bin/sh -c #(nop)  ENV NODE_VERSION=16.20.2     0B
<missing>      19 months ago   /bin/sh -c groupadd --gid 1000 node   && use…   337kB
<missing>      19 months ago   /bin/sh -c #(nop)  CMD ["bash"]                 0B
<missing>      19 months ago   /bin/sh -c #(nop) ADD file:abd1ad48ae3ebec7a…   74.4MB
We first join all run layers into one:
1
2
3
4
5
6
7
8
9
10
11
12
13
14
15
16
17
18
FROM node:16.20.2-bullseye-slim

WORKDIR /usr/src/app

RUN adduser -disabled-password frontenduser

# Port 5000 is reserved on my MacBook, so using port 3000 instead
EXPOSE 3000

COPY . .

ENV REACT_APP_BACKEND_URL=http://localhost/api

RUN npm install && npm run build && npm install -g serve && chown -R frontenduser:frontenduser .

USER frontenduser

CMD [ "serve", "-s", "-l", "3000", "build" ]
This results in an image that is smaller than the original (746 MB) but still relatively large (561 MB):
1
2
3
REPOSITORY              TAG       IMAGE ID       CREATED             SIZE
frontend-optimized-1    latest    6f0611a5e25f   About an hour ago   561MB
frontend-nonroot        latest    e9e65a4d959c   4 hours ago         746MB
If we inspect the layers again we can see that we could benefit from a multi-stage build:
1
2
3
4
5
6
7
8
9
10
11
12
13
14
15
16
17
18
19
20
(base) aljazkovac@Aljazs-MacBook-Pro ~ % docker image history 6f0611a5e25f
IMAGE          CREATED          CREATED BY                                      SIZE      COMMENT
6f0611a5e25f   40 seconds ago   CMD ["serve" "-s" "-l" "3000" "build"]          0B        buildkit.dockerfile.v0
<missing>      40 seconds ago   USER frontenduser                               0B        buildkit.dockerfile.v0
<missing>      40 seconds ago   RUN /bin/sh -c npm install && npm run build …   375MB     buildkit.dockerfile.v0
<missing>      2 hours ago      ENV REACT_APP_BACKEND_URL=http://localhost/a…   0B        buildkit.dockerfile.v0
<missing>      2 hours ago      COPY . . # buildkit                             707kB     buildkit.dockerfile.v0
<missing>      2 hours ago      EXPOSE map[3000/tcp:{}]                         0B        buildkit.dockerfile.v0
<missing>      2 hours ago      RUN /bin/sh -c adduser -disabled-password fr…   338kB     buildkit.dockerfile.v0
<missing>      3 weeks ago      WORKDIR /usr/src/app                            0B        buildkit.dockerfile.v0
<missing>      19 months ago    /bin/sh -c #(nop)  CMD ["node"]                 0B
<missing>      19 months ago    /bin/sh -c #(nop)  ENTRYPOINT ["docker-entry…   0B
<missing>      19 months ago    /bin/sh -c #(nop) COPY file:4d192565a7220e13…   388B
<missing>      19 months ago    /bin/sh -c set -ex   && savedAptMark="$(apt-…   9.49MB
<missing>      19 months ago    /bin/sh -c #(nop)  ENV YARN_VERSION=1.22.19     0B
<missing>      19 months ago    /bin/sh -c ARCH= && dpkgArch="$(dpkg --print…   100MB
<missing>      19 months ago    /bin/sh -c #(nop)  ENV NODE_VERSION=16.20.2     0B
<missing>      19 months ago    /bin/sh -c groupadd --gid 1000 node   && use…   337kB
<missing>      19 months ago    /bin/sh -c #(nop)  CMD ["bash"]                 0B
<missing>      19 months ago    /bin/sh -c #(nop) ADD file:abd1ad48ae3ebec7a…   74.4MB
Let us try some more advanced optimizations (builder pattern and minimize RUN layers where possible):
1
2
3
4
5
6
7
8
9
10
11
12
13
14
15
16
17
18
19
20
21
22
23
24
# Build
FROM node:16.20.2-bullseye-slim AS builder
WORKDIR /usr/src/app
# Helps with caching independencies
COPY package*.json ./
RUN npm install
COPY . .
ENV REACT_APP_BACKEND_URL=http://localhost/api
RUN npm run build

# Runtime
FROM node:alpine
WORKDIR /usr/src/app
# Create non-root user
RUN adduser -D frontenduser && \
    npm install -g serve && \
    chown -R frontenduser:frontenduser .
# Copy static files from builder
COPY --from=builder /usr/src/app/build ./build
# Install server
USER frontenduser
# Port 5000 is reserved on my MacBook, so using port 3000 instead
EXPOSE 3000
CMD ["serve", "-s", "-l", "3000", "build"]
This results in an image that is significantly smaller:
1
2
3
4
REPOSITORY                TAG        IMAGE ID       CREATED             SIZE
frontend-optimized-2      latest     563bc7313368   About an hour ago   176MB
frontend-optimized-1      latest     6f0611a5e25f   39 hours ago        561MB
frontend-nonroot          latest     e9e65a4d959c   41 hours ago        746MB
We have been able to decrease the image size from 746 MB to 176 MB. We could have minimized it even further by using nginx to serve the static files but then we would need to also change the CMD and the port configuration (nginx serves the files on port 80 by default).
Now let us optimize the backend image. The original image size was:
1
2
REPOSITORY       TAG     IMAGE ID       CREATED      SIZE
backend-nonroot  latest  7361b01d6c6e   2 hours ago  1.08GB
Here is the original Dockerfile for the backend:
1
2
3
4
5
6
7
8
9
10
11
12
13
14
15
16
17
18
19
20
21
FROM golang:1.16-bullseye

WORKDIR /usr/src/app

RUN adduser -disabled-password backenduser

EXPOSE 8080

COPY . .

ENV REQUEST_ORIGIN=http://localhost:3000

RUN go build

RUN go test ./...

RUN chown -R backenduser:backenduser .

USER backenduser

CMD [ "./server" ]
We have already learned from the frontend that we would benefit from a multi-stage build, so let us attempt to do that directly here:
1
2
3
4
5
6
7
8
9
10
11
12
13
14
15
16
17
18
19
20
FROM golang:1.16-bullseye AS builder
WORKDIR /usr/src/app
# Copy dependency files first
COPY go.* ./
RUN go mod download
# Copy source code
COPY . .
ENV REQUEST_ORIGIN=http://localhost:3000
RUN go build -o server && go test ./...

FROM debian:bullseye-slim
WORKDIR /usr/src/app
# Add basic tools and create non-root user
RUN apt-get update && apt-get install -y ca-certificates && rm -rf /var/lib/apt/lists/* && useradd -m backenduser
# Copy only the built binary from builder stage
COPY --from=builder /usr/src/app/server .
RUN chown -R backenduser:backenduser server
USER backenduser
EXPOSE 8080
CMD [ "./server" ]
This results in a significantly reduced image size:
1
2
3
REPOSITORY                TAG        IMAGE ID       CREATED              SIZE
backend-optimized-1       latest     0835447d9372   About a minute ago   112MB
backend-nonroot           latest     7361b01d6c6e   25 hours ago         1.08GB
And, most importantly, if we run containers from the optimized images, they work.
Image with preinstalled environment
If we use an Alpine-based image (much smaller than the Ubuntu-based image, for example), then we will probably sooner or later find ourselves lacking some tools. Instead of installing the tools ourselves, it is a good idea to look for images that have preinstalled environments that cover our needs, e.g., Python image (if Python is what we need).
For the backend, I changed the builder and runtime images to slimmer alpine variants:
1
2
3
4
5
6
7
8
9
10
11
12
13
14
15
16
17
18
19
20
21
22
23
FROM golang:1.16-alpine AS builder
WORKDIR /usr/src/app
# Copy dependency files first
COPY go.* ./
RUN go mod download
# Copy source code
COPY . .
ENV REQUEST_ORIGIN=http://localhost:3000
RUN apk add --no-cache build-base && \
    go build -o server && \
    go test ./...

FROM alpine:3.21.3
WORKDIR /usr/src/app
# Add basic tools and create non-root user
RUN apk add --no-cache ca-certificates && \
adduser -D backenduser
# Copy only the built binary from builder stage
COPY --from=builder /usr/src/app/server .
RUN chown -R backenduser:backenduser server
USER backenduser
EXPOSE 8080
CMD [ "./server" ]
This resulted in a significant decrease in image size, from 112 MB to 43 MB:
1
2
3
REPOSITORY              TAG       IMAGE ID       CREATED         SIZE
backend-optimized-2     latest    9ebf470e0a65   4 minutes ago   43MB
backend-optimized-1     latest    0835447d9372   21 hours ago    112MB
For the frontend, I changed the build stage to a slimmer, Alpine version:
1
2
3
4
5
6
7
8
9
10
11
12
13
14
15
16
17
18
19
20
21
22
23
24
# Build
FROM node:16.20.2-alpine AS builder
WORKDIR /usr/src/app
# Helps with caching independencies
COPY package*.json ./
RUN npm install
COPY . .
ENV REACT_APP_BACKEND_URL=http://localhost/api
RUN npm run build

# Runtime
FROM node:16.20.2-alpine
WORKDIR /usr/src/app
# Create non-root user
RUN adduser -D frontenduser && \
    npm install -g serve && \
    chown -R frontenduser:frontenduser .
# Copy static files from builder
COPY --from=builder /usr/src/app/build ./build
# Install server
USER frontenduser
# Port 5000 is reserved on my MacBook, so using port 3000 instead
EXPOSE 3000
CMD ["serve", "-s", "-l", "3000", "build"]
This resulted in a decreased image size, from 176 MB to 129 MB:
1
2
3
REPOSITORY               TAG        IMAGE ID       CREATED          SIZE
frontend-optimized-3     latest     5c70ae0e165c   7 minutes ago    129MB
frontend-optimized-2     latest     563bc7313368   6 hours ago      176MB
I decided to use nginx for the runtime image of the frontend:
1
2
3
4
5
6
7
8
9
10
11
12
13
14
15
16
17
18
19
20
21
22
23
24
25
26
27
28
29
30
31
32
33
34
35
36
37
38
39
40
# Build
FROM node:16.20.2-alpine AS builder
WORKDIR /usr/src/app
# Helps with caching independencies
COPY package*.json ./
RUN npm install
COPY . .
ENV REACT_APP_BACKEND_URL=http://localhost/api
RUN npm run build

# Runtime
FROM nginx:alpine
# Remove default nginx static files and config
RUN rm -rf /usr/share/nginx/html/* && \
    rm /etc/nginx/conf.d/default.conf
# Copy static files from builder
COPY --from=builder /usr/src/app/build /usr/share/nginx/html
# Set up user, permissions, and configuration in one layer
RUN adduser -D frontenduser && \
    # Set up permissions for nginx directories
    chown -R frontenduser:frontenduser /var/cache/nginx && \
    chown -R frontenduser:frontenduser /var/log/nginx && \
    touch /var/run/nginx.pid && \
    chown -R frontenduser:frontenduser /var/run/nginx.pid && \
    # Set permissions for content
    chown -R frontenduser:frontenduser /usr/share/nginx/html && \
    # Create nginx config
    echo 'server { \
    listen 3000; \
    location / { \
        root /usr/share/nginx/html; \
        index index.html; \
        try_files $uri $uri/ /index.html; \
    } \
}' > /etc/nginx/conf.d/default.conf && \
    chown -R frontenduser:frontenduser /etc/nginx/conf.d
USER frontenduser
# Port 5000 is reserved on my MacBook, so using port 3000 instead
EXPOSE 3000
CMD ["nginx", "-g", "daemon off;"]
I had to add some basic nginx config to make it work. The image size has once again been reduced, this time from 129 MB to 51.8 MB:
1
2
3
REPOSITORY              TAG       IMAGE ID       CREATED              SIZE
frontend-optimized-4    latest    3bf23be4d456   About a minute ago   51.8MB
frontend-optimized-3    latest    5c70ae0e165c   About an hour ago    129MB
This was slighly more complicated because the scratch images is completely empty. To get it to work, I had to set some specific environment variables (shout out to claude-3.7-sonnet) to address an architecture mismatch and to force Go to create a statically linked binary (CGO_ENABLED).
Here is the final Dockerfile:
1
2
3
4
5
6
7
8
9
10
11
12
13
14
15
16
17
18
19
20
21
22
23
24
25
26
27
28
29
30
FROM golang:1.16-alpine AS builder
WORKDIR /usr/src/app
# Copy dependency files first
COPY go.* ./
RUN go mod download
# Copy source code
COPY . .
ENV REQUEST_ORIGIN=http://localhost:3000
# Disable CGO for static linking (required for scratch image)
ENV CGO_ENABLED=0
# Set target OS explicitly to Linux
ENV GOOS=linux
# Set target architecture to amd64 (x86_64)
ENV GOARCH=amd64
RUN adduser -D backenduser && \
    apk add --no-cache build-base && \
    go build -o server && \
    go test ./... && \
    chown backenduser:backenduser server

FROM scratch
WORKDIR /usr/src/app
COPY --from=builder /etc/passwd /etc/passwd
# Copy SSL certificates from builder if HTTPS is needed
COPY --from=builder /etc/ssl/certs/ca-certificates.crt /etc/ssl/certs/
# Copy only the built binary from builder stage
COPY --from=builder /usr/src/app/server .
USER backenduser
EXPOSE 8080
CMD [ "./server" ]
The image size has now been reduced from 43 MB to 18.3 MB:
1
2
3
REPOSITORY              TAG       IMAGE ID       CREATED             SIZE
backend-optimized-3     latest    8a5a175d1504   7 minutes ago       18.3MB
backend-optimized-2     latest    9ebf470e0a65   3 hours ago         43MB
I have decided to optimize the SimpleMessageBoard project, which I have used before in this course. The original image size is:
1
2
REPOSITORY                 TAG       IMAGE ID       CREATED          SIZE
simplemessageboard-orig    latest    83ae82efc8c7   49 seconds ago   259MB
The original Dockerfile was this:
1
2
3
4
5
6
7
8
9
10
11
12
13
14
15
16
17
FROM mcr.microsoft.com/dotnet/sdk:8.0 AS build

WORKDIR /usr/src/app

COPY . .

RUN dotnet publish -c Release -o /app/publish

FROM mcr.microsoft.com/dotnet/aspnet:8.0

WORKDIR /app

COPY --from=build /app/publish .

EXPOSE 8080

CMD [ "dotnet", "SimpleMessageBoard.dll" ]
The original Dockerfile already uses a multi-stage build, but I decided to use the Alpine version for both the build and runtime stages, and I also added a user for increased security:
1
2
3
4
5
6
7
8
9
10
11
12
13
FROM mcr.microsoft.com/dotnet/sdk:8.0-alpine AS build
WORKDIR /usr/src/app
COPY . .
RUN dotnet restore
RUN dotnet publish -c Release -o /app/publish

FROM mcr.microsoft.com/dotnet/aspnet:8.0-alpine
WORKDIR /app
RUN adduser -D dotnetuser
COPY --from=build /app/publish .
USER dotnetuser
EXPOSE 8080
CMD [ "dotnet", "SimpleMessageBoard.dll" ]
This resulted in a greatly reduced image size:
1
2
3
REPOSITORY                         TAG        IMAGE ID       CREATED          SIZE
simplemessageboard-optimized-1     latest     6e2594acc8e6   18 minutes ago   127MB
simplemessageboard-orig            latest     83ae82efc8c7   40 minutes ago   259MB
Multi-host environments
Kubernetes runs a workload (application) by placing containers into pods (a set of running containers) and pods into nodes (either a virtual or a physical machine). Each node is managed by the control plane (the container orchestration layer that exposes the API and interfaces to define, deploy and manage the lifecycle of containers) and contains the services necessary to run pods.
Here are some cool resources:
- Kind: to run Kubernetes locally
- k3s and k3d: to run Kubernetes inside containers (k3d creates containerized k3s clusters). This way you can spin up a multi-node k3s cluster on a single machine using docker.
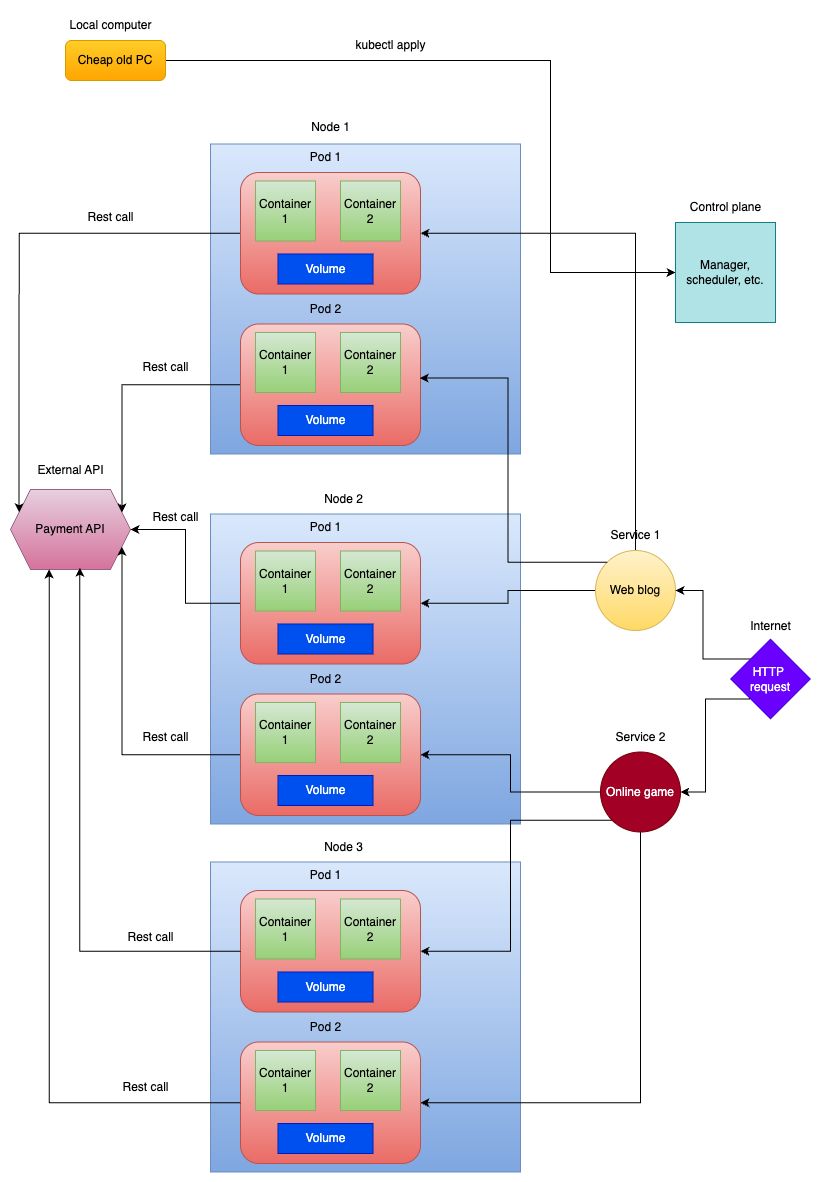 A diagram of the Kubernetes architecture
Summary
In this chapter we learned how to make our Docker images smaller and more secure, by minimizing the number of layers, considering their structure so we can take advantage of Docker’s caching mechanism, and by using multi-stage builds. We have also learned how to use users with limited permissions to make our images more secure. A very useful chapter of this overall great course!
Certificate of completion
 Certificate for completing the Docker security and optimization part of the DevOps with Docker course
Validate the certificate at the validation link.
Closing thoughts
This was such a great and fun course, and I can warmly recommend it. I already had some experience with Docker, but this course made my basics stronger, and taught me a lot more than I thought I needed to know. I learned some new Docker commands and got a lot more comfortable working with images and containers.
Here are some highlights: